

Design
The design for The Mystery Machine was aimed at making the robot easy to assemble and repair, while also not compromising on performance and structural strength. For this we looked to 3D printing and laser cutting for fast prototyping and overall structurally strong parts. We started with a simple four wheel drive car and later incorporated a caster wheel to improve turning.
All 3D printed parts were printed on a PRUSA MK3 using Prusament PetG at .1mm layer height and 15% infill.
Chasis CAD
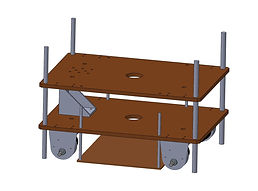

The chasis was designed to be strong, yet easy to assemble and modify. Looking at past ME 210 projects and the resources available, we decided on laser cut platforms connected with threaded rods. The threaded rods allowed us to adjust the height of the platforms while also being easy to assemble. The top platform was used for breadboards, motor controllers, and the teensy LC board. The middle platform held the batteries, circuitry for IR sensing, ON/OFF switch, as well as our circuit breaker. The underside of the middle platform was where we attached our four motor mounts and our IR sensor. Finally, the bottom platform held our line sensors. We originally planned on having a second, smaller robot on this bottom platform, but that idea was later scrapped. The top two plates were cut from 1/4" Duron and the bottom plate was cut from 1/8" Duron. The threaded rods used were of varying sizes based on availability (from .5 to .9 cm diameter).
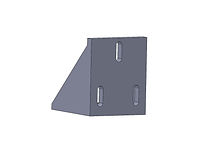
Motor Mount CAD

The Motor Mounts we used were adapted from an online cad sharing source to fit our motors. The mount attaches to the motor and then screws into the middle plate using M3 screws.
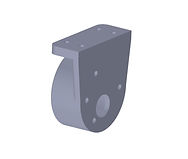
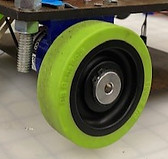
Caster Wheel for Turning


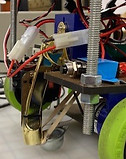
Deciding to use four wheel drive quickly led to some problems with turning. Due to the sticky wheels turning is incredibly slow and ineffective. To fix this we installed a caster wheel attached to a door stop. The doorstop is then controlled by a servo. Engaging the caster wheel allows us to lift on to only the front wheels, we can then turn as if we were just using two wheels. This allowed us to have the pushing force that comes with 4 sticky wheels, while not compromising on turning speed and accuracy.
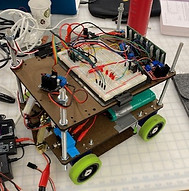
Final Design
Ultimately we decided to go with a four wheel drive robot in order to have more pushing force and stability. Doing this made turing an issue so we came up with the caster arm idea. This allowed us to turn quickly and then move to four wheels to push the walls. This also helped us travel in a straight line as the speed of the four motors will average to some velocity in the forward direction, regardless of the speed of each individual motor. 3D printing and laser cutting allowed us to create the robot quickly and move on to other aspects of the design.